Tuesday 29 March 2011

Hyper 12 - Antenna wire replacement

After taking on the BMX track and skate park on Saturday I was surprised to come away with nothing more than a badly cracked (but still intact) rear wing mount and the thing that stopped me mid run, a broken antenna wire.

This is the second time that this has happened to the truck and is caused by a poor design on the radio box which causes it to get pinched and eventually wear through.

Replacing it is pretty simple though, certainly more simple than trying to sort the design of the radio box!

First up I had to get the Rx out.
The standard Rx on the hyper 12 is a rather basic item that thankfully has a simple flip up lid design allowing easy access.
You can see the remainder of the wire. Possibly long enough for 2.4GHz but not for this radio system!

I recovered the original wire and stripped the end back by about 5mm. Despite being shortened a couple of times it is still plenty long enough!

I heated the solder on the remaining bit of wire up and removed it. While keeping the solder liquid I then slipped the stripped end of the longer section in place. All back in one piece...
My antenna tube also ended up in three pieces so after threading a new one over the wire it was time to put it back together.
I did widen the grove where the wire comes through in an attempt to stop it breaking again but I won't hold my breath. At some point I might be tempted to swap in one of the cheap 2.4GHz systems which would do away with needing an exposed antenna at all. For now though this will do the trick.

Monday 28 March 2011

RS4 Rally Conversion: Final Build Session

Having had another look at the front body / bumper mount I realised that there was no need for the posts at all. The kick up of the front lip gave enough height without the need for the posts to be in place so I could press on without having to make a new part up. I may still make another in the future but I'm getting the urge for a new project of the front wheel drive on road nature so I wanted to get this one done and dusted... for now at least!

Here is the part as it came off the car...
It was time to crack out the Dremel and get rid of those posts.
Posts gone it was time to mark out where the holes would need to go.
Then after drilling...
Yes I did drill them on the wonk but luckily it isn't as bad as the photo makes it look.

After attaching the body posts the whole assembly was screwed onto the car.
The body posts were way too high so I had to remove the outer parts and cut the posts down quite a bit.

All that was left to do was slide on the bumper foam, I also decided to swap the springs (that caused so much hassle and delay!) back to the original black springs that came with the shocks. This meant I could run less spacers and also gave better rebound on the front.
And it is done! I'm sure I'll have another fiddle with it at some point as there are a few bits I'm not completely happy such as- rear body posts (I cut them down one hole too far), front bumper mount (the modified one isn't as rigid as I'd like) and possibly look at adjusting the exhaust or modifying the body cut out.

For now though here it is finished


Friday 25 March 2011

RS4 Rally Conversion: Build Session 6

Just a small update today and again a bit of a backtracking exercise. Not my fault this time though, the advice of the HPI forum was slightly off by saying that I needed to use the Super Nitro Rally body mount. In reality I just had to attach the original one onto the new shock tower. Here it is in place-
All that is left now is to get the front bumper and body mount modeled and prototyped and it will be ready to go!

Tuesday 22 March 2011

RS4 Rally Conversion: Build Session 5

Not exactly a case of one step forwards two steps back tonight, more like seven steps forward six steps back! What am I going on about? Well... it turns out that the front shock tower that I took a while to identify was in fact the rear shock tower! This wasn't apparent until I had fitted the rear (front) shock tower and tried to add the rear body mount which obviously there were no holes to do so!

Oh well, this type of thing is always going to happen on a project like this because I haven't got any instructions to follow!

Anyway I removed the front (rear) tower and swapped them round... and here was mistake number two! There was no way to access the holes for the rear body mount struts once it was fitted. So, off it came again!

Here it is in place...
You probably can't see it from that photo but the struts are like /  \ ... yup mistake number three of the night, I'd used the wrong holes to mount them! I thought they were a bit of a stretch and even modified the mounting points to make them fit better! So off with the shock mount AGAIN!

When re-fitting everything I decided to swap over the rear springs. Even with a daft amount of spacers the rear was too saggy. Here it is back in place.
Even with the new springs it still needed the two largest spacers that came with the new shocks but less than the front. Maybe I'll swap the front springs over at some point.

Final job was to attach the body mount cross plate...
It is taking shape nicely. I now need to pull my finger out and get my front body mount designed and made.

Tuesday 15 March 2011

RS4 Rally Conversion: Build Session 4

First job of the evening was to reassemble the front suspension with the hinge pins and drive shafts in place.
First thing I noticed was that the mounting method for the new shocks was different. Instead of a plastic hole on the end that pushed onto the ball connector, these had a metal bushing in place and would need to be screwed to the shock tower.
Luckily I had enough screws of the correct size to at least get the front end done.
Old and new fixings
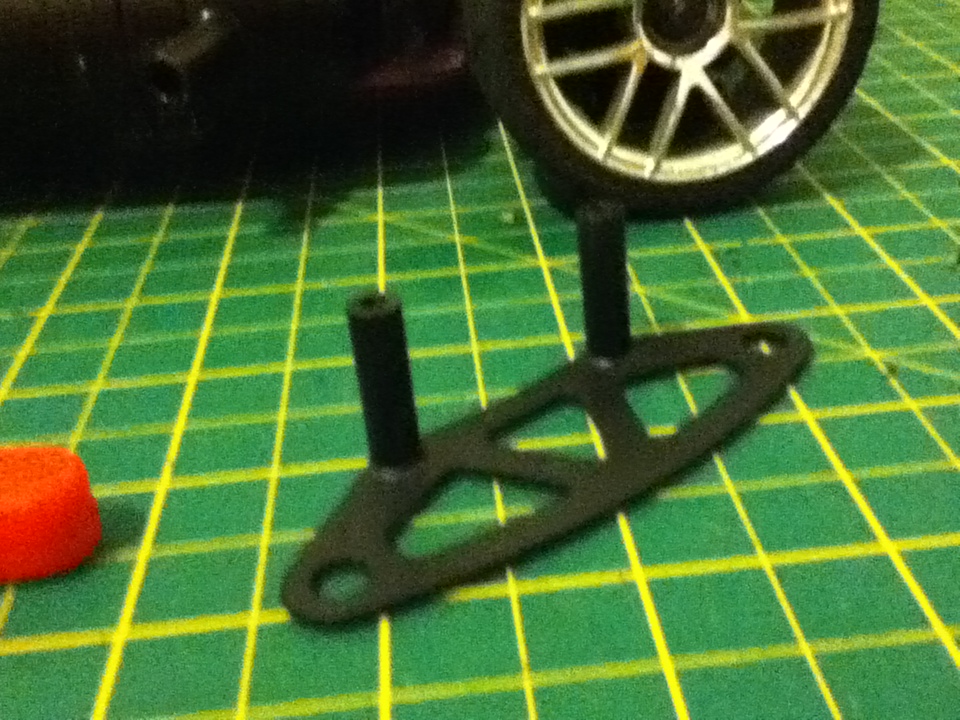
After offering up the new longer shocks it was clear that the original shock tower had to be replaced!
Even with the shock compressed as far as it would go it wouldn't fit!

I removed the original shock tower and after looking back at the parts that came in the plastics kit I worked out which was the suitable part. It wasn't too surprising that I didn't instantly recognise it, the new part is about three times the size! Here it is in place-
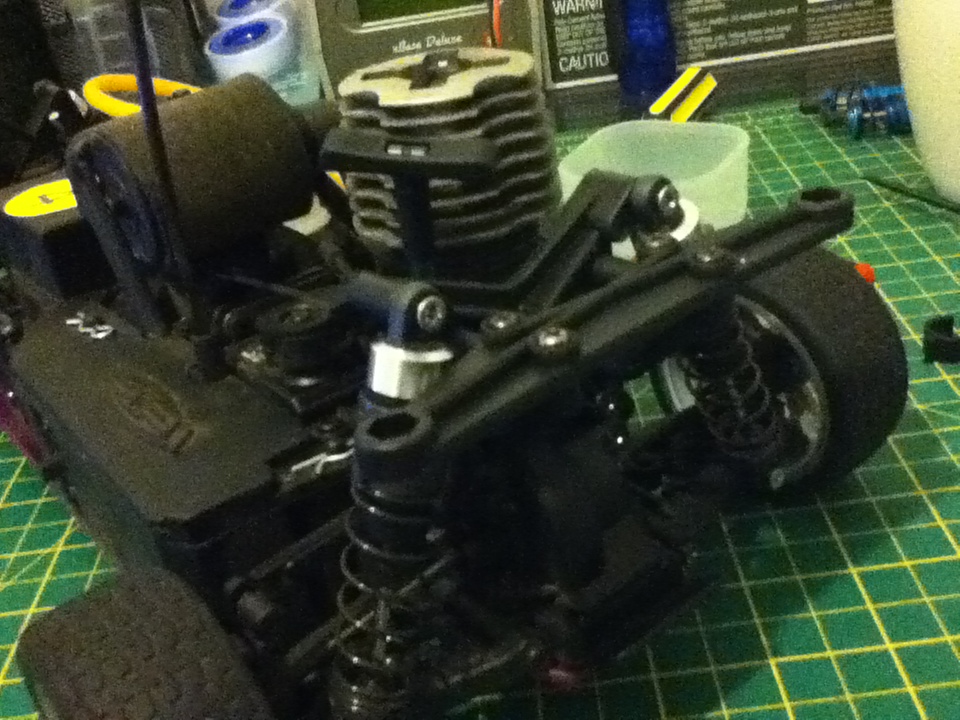
It was then time to get the front shocks on...
Even with one large and one medium spacer in place there was still too much suspension droop so to get the ideal ride height I had to add another large spacer!
This looks pretty daft but it seems to work well and gives both a good suspension feel with good ride height. I might go against the advice of the post on the HPI forum and put the original longer black springs back in but I'll test drive it before I make that decision.

Finally here is the ride height at the front as it stands now.
 A huge improvement and exactly what I was hoping for from the conversion.

Next up... Modeling of my replacement bumper mount and/or rear suspension tower change. Watch this space!

Monday 14 March 2011

RS4 Rally Conversion: Build Session 3

So after realising that all I had to do was push the suspension pins through once the clips were off it was time to push forward with the conversion.

After swapping over the aluminium brace I started to put the suspension back on partly for a test fit. I decided to put the bumper back on too but found that the bumper mounts are different for the Super Nitro Rally, something I hadn't read about in the HPI forum thread for the conversion. As you can see the holes don't line up.
So I decided to take some measurements...
...and a plan was formed!

I'm going to re model this part...
...with the uprights 25mm apart. Once I have a CAD model I can use the rapid prototyping equipment at work to make a new part up. Simple!

Back to the suspension... I can't for the life of me work out which part of the plastics kit is the front shock tower! As far as I can see none of the parts are suitable. So I decided to do a test fit with the original shock tower.
It was still lacking a bit of ride height so I tried modifying the hubs. This involves removing the raised section on the bottom of the hub so that it can pass by the wishbone and therefore give an extended travel. Here it is after being filed flush (it is upside down in the photo!)
This small change gave somewhere between 5 and 10mm of extra ride height (I'll be able to tell properly once the hinge pins are in place). This may not sound like much but it is many times more than I had before!

Thats all for tonight. Next job is to remove the suspension again and put the hinge pins in then put it back together for real with the drive shafts in place.