My old Tamiya FF-01 had a Volvo 850 shell that saw many hundreds of uses over the years. In the end it was battered, most of the paint had come off the front and it was partially held together with cable ties.
Therefore imagine my slightly gutted feeling when I saw what mint ones are going for these days ebay link SEVENTY NINE QUID inc P&P! Maybe the guy is a dreamer but still... damn!
Wednesday, 10 August 2011
Tuesday, 9 August 2011
FF-01 Build - Battery Holder Manufacture
As I've already mentioned the FF-01 came minus a couple of bits. I managed to order a body fitting kit from ebay to replace the missing rear body mounts. At the same time I also ordered a manual, probably come in handy for the £2.50 it cost me. This left me needing to sort the battery holder.
After a bit of Googling I realised that I wasn't going to be able to buy one so I would have to make my own!
I measured up the chassis and did some pencil sketches to get some ideas down and then went into my 3D CAD package of choice, Solidworks.
The part was dead simple to draw, although in hindsight I'd have done it slightly different, maybe a mk2 version is needed but more in that later! Here is what I came up with-


Feeding this into the Insight software that drives the rapid prototyping machine takes this wireframe model and breaks it down into 0.2mm layers (the thickness that the ABS plastic comes out at) and also works out the paths needed to be taken by the machine to lay down both the ABS model material and the support material that is removed after the build is complete.

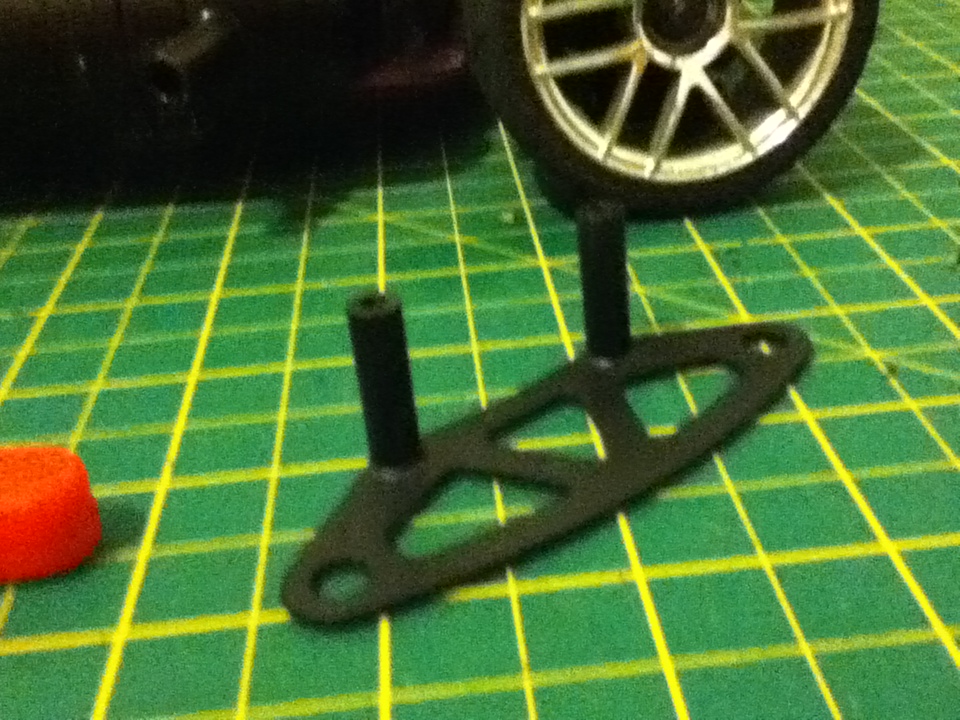
The part took around 50 minutes to build. After it was removed from the machine it looked like this with the support material in place-

The part was quite robust and the support material quite easy to get to so I attacked it with a screwdriver rather than dissolving the support material away.

Time for a test fit!

Like a glove ;) All I need to do now is drill a hole in the centre shaft so I can get a body pin through. I could have added the hole to the model but it would have been filled with support material so I decided to just drill it out after.
So, the improvements I mentioned... I should have added a fillet to the join between the horizontal and vertical parts to improve the durability and remove a stress razor. Secondly I think the original had angled supports on one side. I'll see how my chosen battery fits and may do another version with these added.
After a bit of Googling I realised that I wasn't going to be able to buy one so I would have to make my own!
I measured up the chassis and did some pencil sketches to get some ideas down and then went into my 3D CAD package of choice, Solidworks.
The part was dead simple to draw, although in hindsight I'd have done it slightly different, maybe a mk2 version is needed but more in that later! Here is what I came up with-

The idea was to get the part made up on our ABS rapid prototyping machine. For this I needed to create a wireframe vector model known as an STL. A couple of clicks later and this was done-


The part took around 50 minutes to build. After it was removed from the machine it looked like this with the support material in place-

The part was quite robust and the support material quite easy to get to so I attacked it with a screwdriver rather than dissolving the support material away.

Time for a test fit!

Like a glove ;) All I need to do now is drill a hole in the centre shaft so I can get a body pin through. I could have added the hole to the model but it would have been filled with support material so I decided to just drill it out after.
So, the improvements I mentioned... I should have added a fillet to the join between the horizontal and vertical parts to improve the durability and remove a stress razor. Secondly I think the original had angled supports on one side. I'll see how my chosen battery fits and may do another version with these added.
Monday, 8 August 2011
Another project... I'm actually going to complete this one!
Well after deciding that my Touring/Drifter hybrid wasn't the best of ideas I got rid of the TC3 and decided to concentrate on that niggling idea of another FWD car.
I wanted the same layout as my Tamiya FF-01 (motor mounted in front of the front wheels) as I knew this made the thing handle like a dream. This left me with two options, a brand new FF-03 or hunt out a used FF-01 like I used to have.
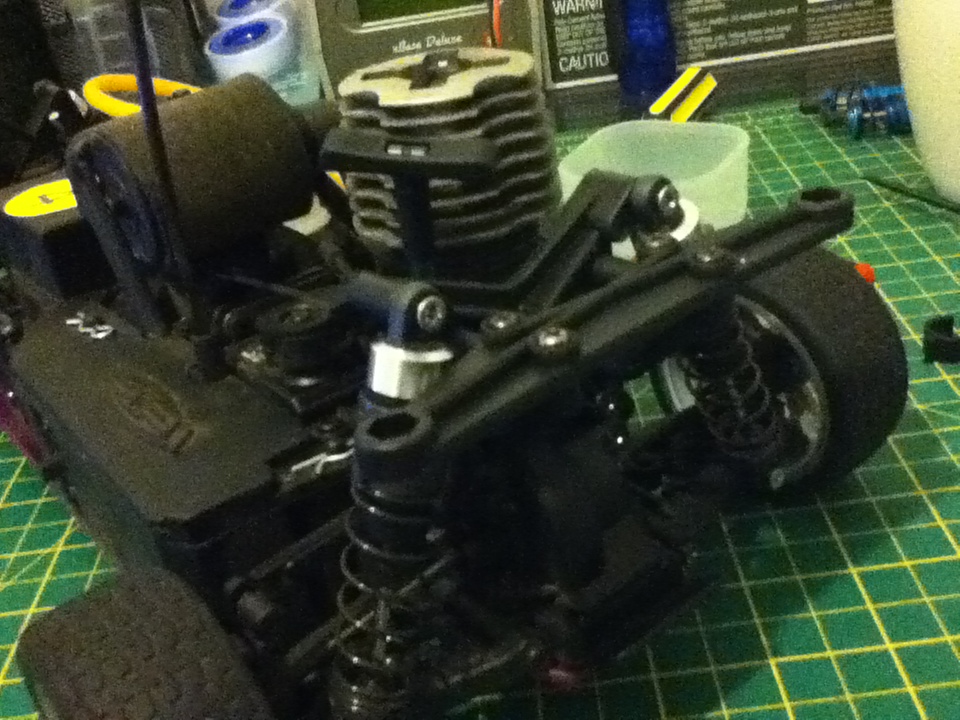
I really can't afford a new FF-03 so when a MSUK forum member mentioned that they might have an FF-01 for sale I bit their hand off! The car is a rolling chassis, just needs rear body mounts which I know I can buy and a battery clip which I will attempt to make if I can't track one down! Here she is (photos from the seller)
 I kept saying how I regretted giving away my old FF-01. Well now I'm not so sure it was a bad idea as this is a much tidier chassis to use as a base.
Plan is to get the radio gear and brushless ESC and motor in there. Then get the battery clip made, everything else will have to wait until I release a few quid out of my RS4 parts which are failing to shift on MSUK. I might just have to bite the bullet and get them on ebay to see the back of them.
As for a shell... I'm not sure yet! All I do know is that it will have LED's and this time round I'm going to try a connection between the body posts and the body itself to get power to them. Not sure if this will work or not but it will be good if I can do it as I will be able to mount the batteries for the LED's on the chassis.
Finally... what about the drifter idea? Well, I will come back to it but from a different angle. How does a tail happy Rally/Drifter hybrid with a D-Box (or in my case a cheap piezo gyro!) sound? Lets get this one finished first anyhow ;-)
I wanted the same layout as my Tamiya FF-01 (motor mounted in front of the front wheels) as I knew this made the thing handle like a dream. This left me with two options, a brand new FF-03
I really can't afford a new FF-03 so when a MSUK forum member mentioned that they might have an FF-01 for sale I bit their hand off! The car is a rolling chassis, just needs rear body mounts which I know I can buy and a battery clip which I will attempt to make if I can't track one down! Here she is (photos from the seller)

Plan is to get the radio gear and brushless ESC and motor in there. Then get the battery clip made, everything else will have to wait until I release a few quid out of my RS4 parts which are failing to shift on MSUK. I might just have to bite the bullet and get them on ebay to see the back of them.
As for a shell... I'm not sure yet! All I do know is that it will have LED's and this time round I'm going to try a connection between the body posts and the body itself to get power to them. Not sure if this will work or not but it will be good if I can do it as I will be able to mount the batteries for the LED's on the chassis.
Finally... what about the drifter idea? Well, I will come back to it but from a different angle. How does a tail happy Rally/Drifter hybrid with a D-Box (or in my case a cheap piezo gyro!) sound? Lets get this one finished first anyhow ;-)
Slash castor block broken again!
Well my glued up castor clock didn't last long! This time it was my own foot that I hit rather than a post! Only a small knock though so obviously the plastic didn't take to gluing very well. Having said that if I had known that the part was only £3.09 I'd have just ordered one anyway!
I did look into uprated parts but the only ones available were aluminium ones at £17.99. I'd rather keep breaking cheap and easy to replace castor blocks than move the damage to something else in the event of an impact.
I ordered them from Modelsport so I should get them in just a few days.
I did look into uprated parts but the only ones available were aluminium ones at £17.99. I'd rather keep breaking cheap and easy to replace castor blocks than move the damage to something else in the event of an impact.
I ordered them from Modelsport so I should get them in just a few days.
Wednesday, 3 August 2011
RC Driving 101
When driving your RC car from the other side of a car park, after thinking "I must avoid those bollards" DON'T then proceed to drive flat out into one of them! Doh!
Car in question was the Slash which came out of it quite well really with a snapped C hub which I have simply super glued back together.
Before that little... incident I was really pleased with the extra speed that the gearing change had. Much more like the pace I was expecting from it! The downside was that while getting used to the extra speed I was grip rolling loads which has put two small cracks in the shell near the back of the roof. Oh well, it isn't a proper Slash without a knackered body!
For now I have just put some duct tape on the inside of the shell to try and stop it spreading.
As for the HoBao, well I remembered to take the right handset this time but found that neither servo would move, all they did was glitch when the power was turned on. The new steering servo turned out to be a duffer but that didn't explain why the throttle servo didn't work. Strangely at home it seemed ok after swapping on my spare battery pack out of the RS4. I've charged the AAA's from the HoBao and I'll just have to keep an eye on it I guess.
Car in question was the Slash which came out of it quite well really with a snapped C hub which I have simply super glued back together.
 |
| Waiting for the glue to dry... |
 |
As for the HoBao, well I remembered to take the right handset this time but found that neither servo would move, all they did was glitch when the power was turned on. The new steering servo turned out to be a duffer but that didn't explain why the throttle servo didn't work. Strangely at home it seemed ok after swapping on my spare battery pack out of the RS4. I've charged the AAA's from the HoBao and I'll just have to keep an eye on it I guess.
Tuesday, 2 August 2011
Buy cheap, buy twice!
Well, I guess my post title is a little unfair. Basically when swapping a pinion on the Slash my 1.5mm hex driver sheared off.
 |
| Where has my tip gone? |
 |
| There it is! (in the end of the grub screw!) |
On another note... the reason I was fiddling with it in the first place? I thought it was about time to try out the optional pinion and spur which allow for greater top speed. I'll see how it goes tonight when I take it out to the Park & Ride car park.
Wednesday, 27 July 2011
TC3... sold!
I decided I couldn't wait to build a storming FWD monster so I have decided to move the TC3 on to a new home. Already sold via the Modelsport forum so I'll be keeping an eye out for the right FWD chassis.
Tuesday, 26 July 2011
Loved it, Loathed it!
So while breaking my (second!) RS4 for parts I was thinking that my cars fall into two distinct categories (well, with one exception!) I either loved them, loathed them... or they are my Traxxas Slash which is just... meh!
So how do they sit, well from where it all began when I was a nipper to current day, here is how they scored!-
Tamiya Thunder Shot - Loved it
Tamiya Boomerang - Loved it
Tamiya FF-01 - Loved it
Kyosho Ultima RB - Loathed it
Tamiya TL-01 - Loathed it
HPI RS4 Evo (x2!) - Loathed them
Tamiya TT-01D - Loved it
Kingmotor Baja - Loved it to drive but it was a PITA so it scores a... Loathed it
HoBao Hyper 12 - Love it
Traxxas Slash - Meh!
So only 1 of 4 nitros hit the spot or 1of 5 internal combustion cars and 4 of 5 Tamiyas were among my best cars.
Interestingly this makes my recent decision to put together a collection of electric Tamiyas together less crazy than it might seem... oops... did I just say that out load?! Better watch this space to see what will be making its way in and out of my collection over the next few months.
Monday, 25 July 2011
Bye Bye RS4
Well I slept on it and I think the RS4 has to go. I've simply never been happy with the car, the rally conversion needs more work than I planned (single speed conversion etc.) and well... I've already got my TC3 project on the go and a few others that I'd like to do sooner rather than later.
I'll keep a fair amount of the car (suspension etc.) as spares and may use these bits to Frankenstein something up in the future. Bespoke bits will end up on ebay and this has solved my issue of where to source a radio for the TC3 at least ;)
I'll keep a fair amount of the car (suspension etc.) as spares and may use these bits to Frankenstein something up in the future. Bespoke bits will end up on ebay and this has solved my issue of where to source a radio for the TC3 at least ;)
Thursday, 21 July 2011
3... no, make that 2 wheels on my wagon!
So I thought I'd treat myself to a little bash at the park and ride this evening.
It was an off the cuff decision to go so I didn't have the Slash's batteries charged (starting to remember what I didn't like about electric!) so I took the recently fettled RS4 and the Hyper 12.
Firstly I wanted to try out the RS4 now that it had the new diff and it drove... exactly the bloody same! Pulled left under throttle dived right when I backed off... AAAARGH! I decided to give it an early bath and went to have a go with the Hyper 12.
I saw that it had half a tank and this got alarm bells ringing. I had changed that knackered steering servo hadn't I? Well, no it turned out that I hadn't. Doh!
So... back to the RS4 then! The rally conversion has shifted the body posts slightly and the fronts are now very wobbly and after two frustrating failed attempts to get the body on with the thing getting impatient and stalling I decided to run it without the body. Crap handling aside this thing is FAST! Way too quick for its new rally life so I'd have to look at the gearing at some point. It was very tricky to control with even travelling in a straight line requiring steering input as you went on and off the throttle. Eventually the inevitable happened and I hit the only car in the car parks tyre. Doh (again)
This resulted in even more strange handling followed a few seconds later by the rear wheel falling off! I was limping it back to me and I found that the handling actually seemed to be more predictable with three wheels and being a basher at heart I decided to blat around on three wheels until the fuel ran out!
Coming towards the end of the tank I was doing a burnout when the front wheel and hub went flying off into the hedge! I couldn't believe it! Seconds later the engine died as the last of the fuel was slurped up and I packed up for home.
Here is the damage-

 As you can see the rear has sheared off and the front... well god knows what happened at the front!
So obviously I'll be getting it back on the road right? Well... I'm not sure I will.
I enjoyed the process of putting the rally conversion together but the car has never been right since I got it, it will always have the flimsy (relative to a rally model) RS4 underpinnings, it needs a new single speed gearing set up to suit the rally nature and the engine is a bit temperamental. All in all I'm tempted to see the back of it.
What would I replace it with? Well, probably the car I was going to buy instead of the RS4 in the first place... The Kyosho DRX. It seems to tick every box straight out of the box. I'll sleep on it (I need to save up for a DRX anyway) but I feel that the RS4 might be making its way onto ebay in bits.
It was an off the cuff decision to go so I didn't have the Slash's batteries charged (starting to remember what I didn't like about electric!) so I took the recently fettled RS4 and the Hyper 12.
Firstly I wanted to try out the RS4 now that it had the new diff and it drove... exactly the bloody same! Pulled left under throttle dived right when I backed off... AAAARGH! I decided to give it an early bath and went to have a go with the Hyper 12.
I saw that it had half a tank and this got alarm bells ringing. I had changed that knackered steering servo hadn't I? Well, no it turned out that I hadn't. Doh!
So... back to the RS4 then! The rally conversion has shifted the body posts slightly and the fronts are now very wobbly and after two frustrating failed attempts to get the body on with the thing getting impatient and stalling I decided to run it without the body. Crap handling aside this thing is FAST! Way too quick for its new rally life so I'd have to look at the gearing at some point. It was very tricky to control with even travelling in a straight line requiring steering input as you went on and off the throttle. Eventually the inevitable happened and I hit the only car in the car parks tyre. Doh (again)
This resulted in even more strange handling followed a few seconds later by the rear wheel falling off! I was limping it back to me and I found that the handling actually seemed to be more predictable with three wheels and being a basher at heart I decided to blat around on three wheels until the fuel ran out!
Coming towards the end of the tank I was doing a burnout when the front wheel and hub went flying off into the hedge! I couldn't believe it! Seconds later the engine died as the last of the fuel was slurped up and I packed up for home.
Here is the damage-


So obviously I'll be getting it back on the road right? Well... I'm not sure I will.
I enjoyed the process of putting the rally conversion together but the car has never been right since I got it, it will always have the flimsy (relative to a rally model) RS4 underpinnings, it needs a new single speed gearing set up to suit the rally nature and the engine is a bit temperamental. All in all I'm tempted to see the back of it.
What would I replace it with? Well, probably the car I was going to buy instead of the RS4 in the first place... The Kyosho DRX. It seems to tick every box straight out of the box. I'll sleep on it (I need to save up for a DRX anyway) but I feel that the RS4 might be making its way onto ebay in bits.
Wednesday, 20 July 2011
RS4 Diff replacement plus the first small step with the TC3!
For various reasons I haven't touched any of my RC cars for over three months, tonight I decided to get back to them and as I mentioned before I was halfway through replacing the front diff on the RS4.
I had removed the old diff already so the car was in bits on the desk and despite this being a relatively simple job I did suffer a bit of "where does that bit go?!" Possibly why once the job was done I was left with...


It has spent its life carpet racing so is immaculate underneath but covered in fluff!

Other than the annoyance of all the hex screws being in inches (more tools required!) I'm looking forward to getting started on it. Tonight I only got as far as giving it a look over and putting one of my cheap Acoms servos in. What I did find though was that my 7 cell Slash cells fit perfectly!

This is a massive bonus in that I can get the car up and running without having to buy more cells. It also means that the decision on which battery connectors to go for has been made for me and no additional charging leads will be needed. Finally it means that when I upgrade to Lipos I'll effectively be upgrading both cars.
I had removed the old diff already so the car was in bits on the desk and despite this being a relatively simple job I did suffer a bit of "where does that bit go?!" Possibly why once the job was done I was left with...

Oh well, I'm sure they weren't that important!
That done I thought I'd have a look at the TC3 that I plan to turn into a drifter tourer hybrid. I bought it as a rolling chassis and it seems to be all there.


Other than the annoyance of all the hex screws being in inches (more tools required!) I'm looking forward to getting started on it. Tonight I only got as far as giving it a look over and putting one of my cheap Acoms servos in. What I did find though was that my 7 cell Slash cells fit perfectly!

This is a massive bonus in that I can get the car up and running without having to buy more cells. It also means that the decision on which battery connectors to go for has been made for me and no additional charging leads will be needed. Finally it means that when I upgrade to Lipos I'll effectively be upgrading both cars.
Monday, 18 July 2011
Bring on the snow!
Just spotted this on the RC Geeks facebook page-


I really need to try that with the Hyper 12 if we have any white stuff this year!
EDIT- Well it seems that you can buy them on ebay... who would have thought it! If you can't get them in 1:12 size then it might make a nice CAD modelling project.
OK... so where were we?!
As you can see from the dates on my later blog posts I haven't touched my RC cars in 3 months to the day. This is not good enough!
Luckily from the blog I can see that the reason my RS4 is in pieces if that it needs a new diff (which is ready to fit still in its original jiffy bag) a good job because I had genuinely forgotten!
To help get things back on track I have made a Google document that has the current status of all of my cars which I have made available to view here
Hopefully amongst my list of 29 things I need to get done around the house (no exaggeration :( ) I'll get some chance to get back to work on them!
Thursday, 14 July 2011
103mph RC Crash!
I'm sure we've all had some pretty hefty crashes in our time but this one surely beats them all! The thing just disintegrates!
Monday, 18 April 2011
RS4 - Front Diff Problems...
Tonight I took the front diff off of the RS4 and it became clear that it was what was causing my handling problems.
Once separated from the rest of the car I found that it did work as it should but the wheels turned easily on one side but were a real effort to turn on the other.
I stripped it all down, re-greased and re assembled and while it is better it is still stiff on one side and now feels a bit lumpy too.
The gears look in good condition and the only two issues I could see were a very used looking washer on the side that was stiff and the casing on one side of the diff being a bit restrictive on the drive hub.
Anyway, I've decided to relegate the whole diff to spare parts and have ordered up a complete new diff from the bay.
Saturday, 16 April 2011
One bash... two broken cars!
Decided to take the RS4 out for the first time since its conversion. Just in case it didn't want to play ball I also brought along "old faithful", my Hyper 12. First up, time to fire up the RS4...
It sparked into life pretty easily which was good because sometimes it can be a bit of a pig. Great! Then within seconds it went out of control and threw itself into a full throttle doughnut! A few seconds later it came back under control and I checked the throttle and steering. Everything seemed fine so I carried on then 30 seconds later it did the same but this time it held the full throttle doughnut for a good 20 seconds or so before thankfully dieing. Best put that one away then.
Disappointed I decided to crack out the Hyper 12... bugger... I left my road wheels at home. Oh well stuff it, I've got a spare set of off road wheels and tyres, lets trash these!
I had a great run with the Hyper 12 for about an hour or so and then the steering became a bit intermittent then died altogether. The reason, a stripped servo gear. First time I've ever done that, not a big problem though, I'll just fit the one that I had intended for the TC3. On the plus side despite an hour of full throttle abuse the tyres were still in good shape.
I decided to try and replicate the radio issues I had with the RS4 with the engine off this time! We found some weird issues with radio reception in that area in the past and I wanted to make sure I had a problem before replacing the radio gear. After 5 minutes of trying it didn't even glitch. So I decided to give it another run to see how it handled.
I was a bit concerned with how the front diff felt before taking it out and it seems that I was right to be concerned. The car tracked fine off the power but on throttle it dived to the left in spectacular fashion.
So in summary I need to:
- Fit a new steering servo on the Hyper 12 - no problem
- Rebuild the front diff on the RS4 - bugger!
Oh well, should keep me busy while I wait for my TC3's brushless setup.
Friday, 15 April 2011
TC3 is here!
I picked up the TC3 from the Post Office yesterday and had just enough time last night to unpack it.
The car looks great, I did notice that one of the front wheels appeared to be very... wobbly but this might be due to the hub nut not being tight. This will be the first thing I look at though.
So far my job list looks a little like this...
Investigate wobbly front wheel!
Set the camber all round
Test fit my S15 shell. (Depending on how this goes I might end up having to add a new shell to my to do list)
Fit a steering servo
Find and fit some radio gear (I might splash out on a cheap 2.4GHz system)
Fit Gyro
I've ordered up an XERun 2700Kv Brushless system for the car. More expensive than the sensorless EZRun but hey you only live once and the Baja sold for about three times what I thought! It is coming from Hong Kong so could be anywhere from 5 days to a month but I'm hoping it will be at the lower end of that scale.
I'm not sure what battery connectors (if any) that it comes with but I have asked the question on Modelsport. Once I know that I can get some Lipos ordered and a balancer for my charger and I think it will then be good to go!
Once I have tested it I will think about locking the rear diff if it feels like it needs it (the TT-01D never did in my opinion) and look at thinks like spring rates and what not. This car was used as a racer (a carpet racer judging by the fluff inside and lack of marks to the chassis) so I need to take it from grippy to tail happy!
Monday, 11 April 2011
Bidding ends!
So after 8 days of bidding all of my Baja auctions came to an end. Net result... £294 which considering that I didn't sell the radio gear or a few other bits and bobs plus I had to sell the engine in pieces as spares or repair... I'm really chuffed with that!
I also overestimated the postage charges slightly so after all of my fees I should easily clear £300, maybe £310 :)
I also overestimated the postage charges slightly so after all of my fees I should easily clear £300, maybe £310 :)
Thursday, 7 April 2011
Another one for the list!
I've been considering a scaler crawler, in fact it was going to be my next purchase but concerns over whether I'd get bored of the lack of speed and even bigger concerns of finding places with a suitably tough terrain meant that I put it off and instead started my drift car project.
Thankfully Axial have read my mind and come up with this...
Thankfully Axial have read my mind and come up with this...
 |
| http://www.axialracing.com/ftp/wraith/index.html |
Basically it is a slightly compromised crawler that is geared up and with a lower turn (20t) motor. Todays bash at Holkham which was a bit heavy going for the Hyper 12 would have been ideal as would loads of spots that spring to mind. I may even consider swapping the Slash for one...
It will come as both a RTR and my preferred option a kit.
Here is a video showing what it can do... I'm off to get saving!
Monday, 4 April 2011
New Project! TC3 Drifter!
So a while ago I sold up my TT-01D drift car that I butchered for parts. To be honest I abused this car a fair amount by jumping it etc. The main issue I had was that it was a great drifter but as with all good drift cars it was geared really low and had loads of punch but bugger all in the way of speed.
Fast forward a month or so and I went to Modified Live at Snetterton and saw the D1RC drift demonstrations and decided that I wanted a drifter again! BUT I know I will get bored of its lack of speed so what should I do... well make a drifter/touring car hybrid of course!
So what the hell is one of those?! Well... I don't know, I just made it up but here are my plans!
Touring car chassis
Suitable drift body complete with bodyset (exhausts etc.) and LED's
Drift wheels and tyres
Mid range Brushless motor / esc (13t or higher)
Drift Box (Gyro) for holding high speed drifts
ummm.... I think that will do for now!
So for a starter (well I say start, I've already bought my gyro, more on that when it arrives) I need a touring car chassis. I worked out that I would like to do a grand total of seven RC projects before I can say that I'm happy I have all vehicle types covered... and I'm sure some more will pop up along the way. There is no way I can do this with new kits unless I go mega cheap so... should I go cheap or should I go second hand? Well I've never bought a second hand RC car before so it was time to give it a punt!
I hit ebay with the intention of buying the first decent TC chassis from a brand I've heard of for less than £50.
I found a TC3 roller with no bids and a £24.99 starting bid. It was a racer who was selling up, the car looked in good condition, no electrics and no body... perfect! I stuck in a bid and waited the 2 1/2 hours to the end of the auction. No one else put a bid in so I got it for the starting bid plus £9.99 postage... Sweet!
As soon as it arrives I'll asses the condition of it and if all is well get the project underway. If it is no good I'll shift it back on and look for either a new chassis or another used one.
More when it arrives!
Selling up the Baja
My 1/5 scale 2 stroke Baja has been sat in the garage for a couple of years now and it was time to get rid of it.
It was a cracking machine but too big for its own good. The size made it difficult to work on, difficult to use in small places and so easy to bend when you... er... hit stuff!
So a few days ago I turned this...


It was a cracking machine but too big for its own good. The size made it difficult to work on, difficult to use in small places and so easy to bend when you... er... hit stuff!
So a few days ago I turned this...

Into this...

There were loads more bits but they wouldn't all fit on the desk!
All the parts are now listed on ebay. All 99p start and no reserve so we'll see what happens. So far there has been quite a lot of interest so I should raise a few quid... Which is a good job as I've already bought my next project!
Tuesday, 29 March 2011
Hyper 12 - Antenna wire replacement
After taking on the BMX track and skate park on Saturday I was surprised to come away with nothing more than a badly cracked (but still intact) rear wing mount and the thing that stopped me mid run, a broken antenna wire.
This is the second time that this has happened to the truck and is caused by a poor design on the radio box which causes it to get pinched and eventually wear through.
Replacing it is pretty simple though, certainly more simple than trying to sort the design of the radio box!
First up I had to get the Rx out.
 The standard Rx on the hyper 12 is a rather basic item that thankfully has a simple flip up lid design allowing easy access.
 You can see the remainder of the wire. Possibly long enough for 2.4GHz but not for this radio system!
I recovered the original wire and stripped the end back by about 5mm. Despite being shortened a couple of times it is still plenty long enough!
I heated the solder on the remaining bit of wire up and removed it. While keeping the solder liquid I then slipped the stripped end of the longer section in place. All back in one piece...
 My antenna tube also ended up in three pieces so after threading a new one over the wire it was time to put it back together.
 I did widen the grove where the wire comes through in an attempt to stop it breaking again but I won't hold my breath. At some point I might be tempted to swap in one of the cheap 2.4GHz systems which would do away with needing an exposed antenna at all. For now though this will do the trick.
This is the second time that this has happened to the truck and is caused by a poor design on the radio box which causes it to get pinched and eventually wear through.
Replacing it is pretty simple though, certainly more simple than trying to sort the design of the radio box!
First up I had to get the Rx out.


I recovered the original wire and stripped the end back by about 5mm. Despite being shortened a couple of times it is still plenty long enough!
I heated the solder on the remaining bit of wire up and removed it. While keeping the solder liquid I then slipped the stripped end of the longer section in place. All back in one piece...


Monday, 28 March 2011
RS4 Rally Conversion: Final Build Session
Having had another look at the front body / bumper mount I realised that there was no need for the posts at all. The kick up of the front lip gave enough height without the need for the posts to be in place so I could press on without having to make a new part up. I may still make another in the future but I'm getting the urge for a new project of the front wheel drive on road nature so I wanted to get this one done and dusted... for now at least!
Here is the part as it came off the car...


Here is the part as it came off the car...
It was time to crack out the Dremel and get rid of those posts.

Posts gone it was time to mark out where the holes would need to go.

Then after drilling...

Yes I did drill them on the wonk but luckily it isn't as bad as the photo makes it look.
After attaching the body posts the whole assembly was screwed onto the car.

The body posts were way too high so I had to remove the outer parts and cut the posts down quite a bit.
All that was left to do was slide on the bumper foam, I also decided to swap the springs (that caused so much hassle and delay!) back to the original black springs that came with the shocks. This meant I could run less spacers and also gave better rebound on the front.

And it is done! I'm sure I'll have another fiddle with it at some point as there are a few bits I'm not completely happy such as- rear body posts (I cut them down one hole too far), front bumper mount (the modified one isn't as rigid as I'd like) and possibly look at adjusting the exhaust or modifying the body cut out.
For now though here it is finished

Friday, 25 March 2011
RS4 Rally Conversion: Build Session 6
Just a small update today and again a bit of a backtracking exercise. Not my fault this time though, the advice of the HPI forum was slightly off by saying that I needed to use the Super Nitro Rally body mount. In reality I just had to attach the original one onto the new shock tower. Here it is in place-
 All that is left now is to get the front bumper and body mount modeled and prototyped and it will be ready to go!

Tuesday, 22 March 2011
RS4 Rally Conversion: Build Session 5
Not exactly a case of one step forwards two steps back tonight, more like seven steps forward six steps back! What am I going on about? Well... it turns out that the front shock tower that I took a while to identify was in fact the rear shock tower! This wasn't apparent until I had fitted the rear (front) shock tower and tried to add the rear body mount which obviously there were no holes to do so!
Oh well, this type of thing is always going to happen on a project like this because I haven't got any instructions to follow!
Anyway I removed the front (rear) tower and swapped them round... and here was mistake number two! There was no way to access the holes for the rear body mount struts once it was fitted. So, off it came again!
Here it is in place...
 You probably can't see it from that photo but the struts are like / \ ... yup mistake number three of the night, I'd used the wrong holes to mount them! I thought they were a bit of a stretch and even modified the mounting points to make them fit better! So off with the shock mount AGAIN!
When re-fitting everything I decided to swap over the rear springs. Even with a daft amount of spacers the rear was too saggy. Here it is back in place.
 Even with the new springs it still needed the two largest spacers that came with the new shocks but less than the front. Maybe I'll swap the front springs over at some point.
Final job was to attach the body mount cross plate...
 It is taking shape nicely. I now need to pull my finger out and get my front body mount designed and made.
Oh well, this type of thing is always going to happen on a project like this because I haven't got any instructions to follow!
Anyway I removed the front (rear) tower and swapped them round... and here was mistake number two! There was no way to access the holes for the rear body mount struts once it was fitted. So, off it came again!
Here it is in place...

When re-fitting everything I decided to swap over the rear springs. Even with a daft amount of spacers the rear was too saggy. Here it is back in place.

Final job was to attach the body mount cross plate...
Tuesday, 15 March 2011
RS4 Rally Conversion: Build Session 4
First job of the evening was to reassemble the front suspension with the hinge pins and drive shafts in place.


First thing I noticed was that the mounting method for the new shocks was different. Instead of a plastic hole on the end that pushed onto the ball connector, these had a metal bushing in place and would need to be screwed to the shock tower.

Luckily I had enough screws of the correct size to at least get the front end done.
 |
| Old and new fixings |
After offering up the new longer shocks it was clear that the original shock tower had to be replaced!

Even with the shock compressed as far as it would go it wouldn't fit!
I removed the original shock tower and after looking back at the parts that came in the plastics kit I worked out which was the suitable part. It wasn't too surprising that I didn't instantly recognise it, the new part is about three times the size! Here it is in place-

It was then time to get the front shocks on...

Even with one large and one medium spacer in place there was still too much suspension droop so to get the ideal ride height I had to add another large spacer!

This looks pretty daft but it seems to work well and gives both a good suspension feel with good ride height. I might go against the advice of the post on the HPI forum and put the original longer black springs back in but I'll test drive it before I make that decision.
Finally here is the ride height at the front as it stands now.

A huge improvement and exactly what I was hoping for from the conversion.
Next up... Modeling of my replacement bumper mount and/or rear suspension tower change. Watch this space!
Monday, 14 March 2011
RS4 Rally Conversion: Build Session 3
So after realising that all I had to do was push the suspension pins through once the clips were off it was time to push forward with the conversion.
After swapping over the aluminium brace I started to put the suspension back on partly for a test fit. I decided to put the bumper back on too but found that the bumper mounts are different for the Super Nitro Rally, something I hadn't read about in the HPI forum thread for the conversion. As you can see the holes don't line up.


Back to the suspension... I can't for the life of me work out which part of the plastics kit is the front shock tower! As far as I can see none of the parts are suitable. So I decided to do a test fit with the original shock tower.
 It was still lacking a bit of ride height so I tried modifying the hubs. This involves removing the raised section on the bottom of the hub so that it can pass by the wishbone and therefore give an extended travel. Here it is after being filed flush (it is upside down in the photo!)

Thats all for tonight. Next job is to remove the suspension again and put the hinge pins in then put it back together for real with the drive shafts in place.
After swapping over the aluminium brace I started to put the suspension back on partly for a test fit. I decided to put the bumper back on too but found that the bumper mounts are different for the Super Nitro Rally, something I hadn't read about in the HPI forum thread for the conversion. As you can see the holes don't line up.

So I decided to take some measurements...


...and a plan was formed!
I'm going to re model this part...

...with the uprights 25mm apart. Once I have a CAD model I can use the rapid prototyping equipment at work to make a new part up. Simple!
Back to the suspension... I can't for the life of me work out which part of the plastics kit is the front shock tower! As far as I can see none of the parts are suitable. So I decided to do a test fit with the original shock tower.


This small change gave somewhere between 5 and 10mm of extra ride height (I'll be able to tell properly once the hinge pins are in place). This may not sound like much but it is many times more than I had before!
Subscribe to:
Comments (Atom)